A few weeks ago I received a set of Grips and a set of studded Gloves to test in snow and ice here in the frozen Northeast. Since that first successful test, we've had an odd combination of near-50's rainy weather and near-0° windstorms! Not only that, I sold my saddle and don't have another one yet. Zephyr is so full of energy right now that I don't dare ride bareback... he bucked me off on our last ride WITH a saddle!
So today, since I have nothing to add regarding hoof boots, I would like to speak to the "I don't have the facilities / time / equipment / skills to trim my own horse's hooves" argument. Hogwash! I'm an amateur, for sure, but I'm holding my own with minimal equipment, and without any facilities, time, or formal instruction. (I do admit it's a lot easier with only one horse!)
For equipment, I just use a $10 rasp, a $25 hoof knife I was given by an old farrier (as his blessing to do my own trims), a round chainsaw file to sharpen the knife, and a basic $25 iron hoof stand... nothing else. Anytime my back starts to hurt I stand up and stretch, and maybe walk Zephyr around for a moment.
I live in Maine, as you may have gathered, where there is snow on the ground for half the year. I do not have a barn to trim hooves in, I'm SUPPOSED to have half of the garage for a grooming / tack / feed room but for the last year it's been out of service because my husband was rewiring / insulating / sheetrocking / painting it in preparation for using his half as a workshop. Instead I tie to the trailer.
This summer/fall, it was fine, I was trimming about once a week so it only took about 20-30 minutes to do a thorough job. I could fit it in after work, or even before a weekend ride. But this time of year is harder. During the week I get home at 6pm, which right now is about 1.5 hours after dark, so hoof trimming waits until the weekend. If a particular weekend is too cold, too snowy, too rainy, or too windy, hoof trimming doesn't get done. That's OK, it can wait, I'm not riding in those conditions anyway!
Keep in mind that last summer I was re-learning to trim, and I accidentally allowed quite a bit of excess length and some hoof wall flares to develop. My goal is, over time, to shorten Zephyr's hooves overall and to eliminate those flares. So my methods are specific to that, but you may find some helpful tips too, who knows. I just do what works for my body and my horse, in my facilities (such as they are), and with my tools.
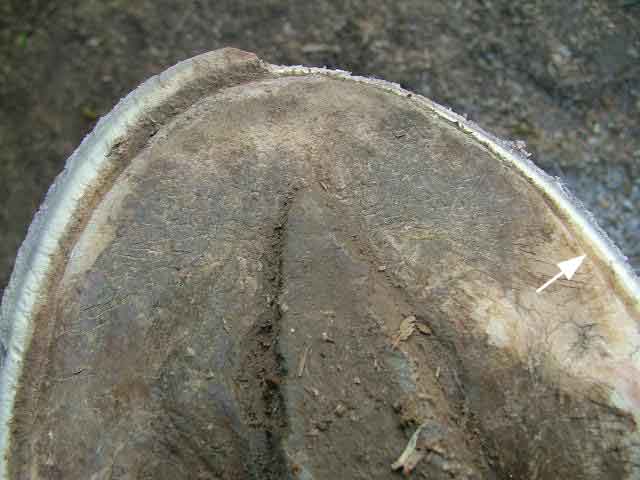
After cleaning out the hoof with a hoof pick and brush, and using the hoof knife to clean out the seat of corn, I start by putting the hoof on the hoof stand and "trimming from the top", or making a vertical cut in the hoof wall. Until recently I was going all the way to the white line with this, but now that the flares are under control I'm starting to be less drastic and only go to the water line. If you're confused what I mean, go here, click on "Do Trim", and scroll down to "Back up the Toe". I've stolen a picture from that site to show what it looks like from the bottom, when half done. The dark brown line is the "white line", which in this case has stretched and attracted dirt, and the cream-colored line to the outside of that is the "water line".
Once I've finished the Trimming from the Top part, I start working from the bottom. I don't tend to put the hoof between my legs (the classic farrier stance) because it feels awkward... I hold each front hoof with the inside hand, and rasp with the outside hand.
I rasp the quarters before I do the heels; it makes doing the heels easier because there's less surface area to rasp. I rasp the heels one side at a time, doing my best to avoid rasping toe callous or sole. The best way to do this, I've found, is to rasp each heel individually with the rasp pointing from the middle of the heel to the outside of the hoof.
Many times, with front hooves, I will kneel on one knee, and place the hoof upside down on the other knee while I work on the heel. For hind feet, I recently discovered that it works great to hold the hoof in the inside hand, turn the rasp handle-end away, grap the point/handle in my hand, and use my forearm to press the rasp against the hoof. This gives great leverage and keeps the rasp level against the hoof.
Of course to check the balance I need to stand up and sight along the sole. (Did you know the best way to check heel balance is to sight along the sole and compare the distance from the hairline to the heel? As much as I've read about hoof trimming in the last few years, I had forgotten that tip until a farrier I recently had check my work reminded me of it.)
Then I finish the hoof with a strong "mustang roll" all the way around to discourage cracking and flares.
I do one hoof at a time until it looks finished, then go back and double check them all in the same order so any differences between the first hoof and the last hoof become more obvious.
I can't wait until I have use of the garage again... for now, all of my tack and supplies are still in the trailer, which is about 200' from the house, parked alongside a very icy paved driveway. So before I trim Zephyr's hooves, I have to liberally sand the driveway between the paddock gate and the area I'll be working. Even so, the hoof stand tends to scoot away if Zephyr puts much weight on his leg.
I did finally manage to trim Zephyr's hooves last weekend, at about the 4-week mark, but unfortunately my camera wasn't available. It was interesting to work with that much growth. His bars and heels were quite long compared to when I've been trimming every week, which made it very easy to see the medial-lateral imbalance that he tends to develop. I was super careful to get that as balanced as I could, and was gratified that he was standing more under himself and with his legs more straight than before the trim.
I was thrilled with the lack of hoof flares, both on the sides of all four hooves (the white lines had stretched quite a bit), and on the fronts of his front hooves. The side flares are just about gone, the white line is tight and dirt free! The toe flares are almost gone, the white line has always been tight and dirt free but there was a scoop to the toe that is now very minimal and I was able to almost entirely eliminate it by rasping the bottom inch of the outsides of the hoof walls. I do wish the frogs on his front feet were in better shape, but I doubt he'll ever have the flat/hard frogs of a Western horse. It's just too wet here.
Again, I am an amateur who only has to learn how to trim one particular horse, and only needs to be effective in trimming style... there are no owners looking at me and thinking "I've never seen a farrier stand that way to trim a horse". I have horrible conditions to trim in, hardly any time to do it, basic/cheap equipment. My saving grace is a willingness to admit when I'm in over my head, and to ask any and all farriers for input. Occasionally I find one that I decide has less business trimming a horse than *I* do, but most of the time I find that the feedback is positive with just a few improvements or pointers.
If I can do it, I bet you can too.
Thursday, December 31, 2009
Tips from an Amateur Hoof Trimmer
Tuesday, December 15, 2009
First Test of Studded Hoof Boots
We got our first snow a couple of weeks ago, and another storm a few days later followed by rain, so we've got about 4" of snow laying on the ground... some of which covers ice but you can't tell until you hit it! I thought yesterday's sunny 34° weather would make a perfect day to test the set of studded Easyboot Gloves that arrived last week.


I had to tie to the telephone pole in my driveway because there was so much ice around my trailer that even I didn't want to go there without my YakTrax on my boots! I wanted him to have his studded boots on before we went up to the trailer to tack up.
It's been pretty cold lately and our garage / grooming area is still out of service due to a remodel, so I haven't trimmed Zephyr's hooves in about 3 weeks. For that matter, I haven't really looked very hard at them either so I wasn't sure what I'd find when it came time to see if I could get the boots on.
Luckily, his hooves looked great! The quarters had been badly stretched at the end of the summer, but all autumn I've been working on bringing them tight again. They've responded a lot faster than the toe flare has, but even that is looking a lot better.

I was in a hurry to boot up and get on the trail because my husband was waiting until I left to to use the chainsaw on a deadfall tree that had fallen next to the trailer... so I don't have as many pictures as I'd like. The photo above his Zephyr's right-front hoof. Here's that same hoof in a size 2 boot without any trimming:

I'm pleased at the amount of spread in the V ... that toe flare is really getting under control! His hoof wall is in contact with the boot all the way down the front of the boot, unlike it has been recently.
In fact, I'm pleased to say that all four boots went on without any trimming... and that's with the same sizes that I've been using since the end of the summer (larger than he started with). The difference is that the toe flares seem to be getting under control! I will be interested to see whether he needs to move down a size when I next trim him.

From the first moment he stepped onto the ice, Zephyr felt very secure in his boots... just like me in my YakTrax! (This photo was hard to take without a helper.)

My husband needed me to leave so he could start cutting up the tree that had fallen next to the trailer. The sunshine had deserted us and twilight would be on us sooner than we wanted!

So, as quickly as I could, I tacked up and headed down the driveway. Zephyr's walk felt bouncy underneath me, and I began to think safety might be a priority today. I had planned to ride down the side of the road, but the horse-eating black garbage bag over our neighbor's rhodedendron sent him scrambling backwards so I headed up a short trail that leads from our driveway to the neighbor's dead-end road.
It's about .8 miles long, and goes up a steady but not very steep hill the whole way, so it makes a good place to just do laps in the wintertime. My husband jokes with me about it... "walk up, walk down, trot up, walk down, canter up, walk down, trot up, walk down, walk up, walk down." Hey, it's a good workout, we don't have to go far from home, and we can quit anytime we get cold or bored. It's easier to face a ride at 10°F when you know you're not locked in for hours of agony!
Anyway, when I turned onto the road I was pleased to find that it hadn't been plowed. It's a much nicer place to ride when it's not plowed! And for the first time I didn't even have to worry about hidden patches of ice, because Zephyr was wearing his new studded boots.
He felt GREAT and sprung into a trot within the first few yards. His trot got prancier and prancier until he slipped comfortably into a beautiful left-lead canter. YEAH, I thought! He NEVER volunteers a left-lead canter, so this new Barefoot Atlanta saddle I have on loan must be comfortable for him, and the boots must feel good too.
He cantered on the left lead almost all the way up the next hill, and I could feel him starting to get faster and faster. I was just leaning back to slow him down, when I felt him take three giant leaps like a bunny rabbit. On the third leap he threw in a joyous little buck, which because he was on the rare left lead I wasn't ready for, and off I went.
As I somersaulted gracefully through the air, I consciously kept a firm grip with my left hand on the rein and also rolled to the left to avoid being stepped on. When I looked up, he was standing over me, looking down as if to say "well it's not MY fault you couldn't stay on".
It took a few minutes to stop my legs from shaking, no matter how often I fall off it always makes me shaky. I took advantage of being on the ground to check the boot gaiters. They were still about as tight as I could get them while still fastening straight across. That is to say, they weren't very tight at all and there was some snow packed down inside but I know from experience that as they get broken in I'll be able to fasten them tighter.
Then I led him over to a stump, tightened the girth for good measure, and climbed back on. We walked up to the top, walked back down, trotted up the hill, walked back down, and then trotted most of the way before cantering to the top. I made sure to keep him slow and in control this time!
When we returned and I pulled off the boots, I was pleased to find that there were no rubs anywhere, not from snow/ice getting inside the gaiter and not from the boot being too tight in the heel. Again, I'll be interested to see if he drops a size after his next trim.
All in all, despite the fall, it was a successful first test of our studded boots. I never had to worry about ice hidden under the snow, and he was perfectly safe on the ice-covered pavement in my driveway.
From now on, unsafe footing is NOT an excuse for me to stay on the couch instead of riding!
Yours truly,
The Boot Maine-iac
I had to tie to the telephone pole in my driveway because there was so much ice around my trailer that even I didn't want to go there without my YakTrax on my boots! I wanted him to have his studded boots on before we went up to the trailer to tack up.
It's been pretty cold lately and our garage / grooming area is still out of service due to a remodel, so I haven't trimmed Zephyr's hooves in about 3 weeks. For that matter, I haven't really looked very hard at them either so I wasn't sure what I'd find when it came time to see if I could get the boots on.
Luckily, his hooves looked great! The quarters had been badly stretched at the end of the summer, but all autumn I've been working on bringing them tight again. They've responded a lot faster than the toe flare has, but even that is looking a lot better.
I was in a hurry to boot up and get on the trail because my husband was waiting until I left to to use the chainsaw on a deadfall tree that had fallen next to the trailer... so I don't have as many pictures as I'd like. The photo above his Zephyr's right-front hoof. Here's that same hoof in a size 2 boot without any trimming:
I'm pleased at the amount of spread in the V ... that toe flare is really getting under control! His hoof wall is in contact with the boot all the way down the front of the boot, unlike it has been recently.
In fact, I'm pleased to say that all four boots went on without any trimming... and that's with the same sizes that I've been using since the end of the summer (larger than he started with). The difference is that the toe flares seem to be getting under control! I will be interested to see whether he needs to move down a size when I next trim him.
From the first moment he stepped onto the ice, Zephyr felt very secure in his boots... just like me in my YakTrax! (This photo was hard to take without a helper.)
My husband needed me to leave so he could start cutting up the tree that had fallen next to the trailer. The sunshine had deserted us and twilight would be on us sooner than we wanted!
So, as quickly as I could, I tacked up and headed down the driveway. Zephyr's walk felt bouncy underneath me, and I began to think safety might be a priority today. I had planned to ride down the side of the road, but the horse-eating black garbage bag over our neighbor's rhodedendron sent him scrambling backwards so I headed up a short trail that leads from our driveway to the neighbor's dead-end road.
It's about .8 miles long, and goes up a steady but not very steep hill the whole way, so it makes a good place to just do laps in the wintertime. My husband jokes with me about it... "walk up, walk down, trot up, walk down, canter up, walk down, trot up, walk down, walk up, walk down." Hey, it's a good workout, we don't have to go far from home, and we can quit anytime we get cold or bored. It's easier to face a ride at 10°F when you know you're not locked in for hours of agony!
Anyway, when I turned onto the road I was pleased to find that it hadn't been plowed. It's a much nicer place to ride when it's not plowed! And for the first time I didn't even have to worry about hidden patches of ice, because Zephyr was wearing his new studded boots.
He felt GREAT and sprung into a trot within the first few yards. His trot got prancier and prancier until he slipped comfortably into a beautiful left-lead canter. YEAH, I thought! He NEVER volunteers a left-lead canter, so this new Barefoot Atlanta saddle I have on loan must be comfortable for him, and the boots must feel good too.
He cantered on the left lead almost all the way up the next hill, and I could feel him starting to get faster and faster. I was just leaning back to slow him down, when I felt him take three giant leaps like a bunny rabbit. On the third leap he threw in a joyous little buck, which because he was on the rare left lead I wasn't ready for, and off I went.
As I somersaulted gracefully through the air, I consciously kept a firm grip with my left hand on the rein and also rolled to the left to avoid being stepped on. When I looked up, he was standing over me, looking down as if to say "well it's not MY fault you couldn't stay on".
It took a few minutes to stop my legs from shaking, no matter how often I fall off it always makes me shaky. I took advantage of being on the ground to check the boot gaiters. They were still about as tight as I could get them while still fastening straight across. That is to say, they weren't very tight at all and there was some snow packed down inside but I know from experience that as they get broken in I'll be able to fasten them tighter.
Then I led him over to a stump, tightened the girth for good measure, and climbed back on. We walked up to the top, walked back down, trotted up the hill, walked back down, and then trotted most of the way before cantering to the top. I made sure to keep him slow and in control this time!
When we returned and I pulled off the boots, I was pleased to find that there were no rubs anywhere, not from snow/ice getting inside the gaiter and not from the boot being too tight in the heel. Again, I'll be interested to see if he drops a size after his next trim.
All in all, despite the fall, it was a successful first test of our studded boots. I never had to worry about ice hidden under the snow, and he was perfectly safe on the ice-covered pavement in my driveway.
From now on, unsafe footing is NOT an excuse for me to stay on the couch instead of riding!
Yours truly,
The Boot Maine-iac
Subscribe to:
Posts (Atom)